How To Create/Design a Poster
Typically a poster is composed of a title, introduction, overview of experimental approach, results, discussion of results, reference articles, and credits. All capable of being read in under 10 minutes.
When creating your poster Microsoft PowerPoint is recommended as the source software. Other poster creation software such as "OpenOffice" and "PosterGenius" are also available. Just be sure you have a means to convert the poster to Adobe PDF format.
Before the actual design of the poster begins be sure you know what size your poster should be. If you are attending a conference, check to see if it places a specific size limitation on your submission. It may require that the poster be 36" x 24", for example, or the dimensions may be specified in metric if the conference is of an international nature. Also find out how the poster will be supported for public viewing, e.g., attached to solid foam poster board resting on an easel or perhaps attached to a wall or partition. Be sure you understand what is necessary for you to provide vs. what the conference sponsors will provide relative to poster viewing by the public. Also consider how the poster will be transported to the conference site if travel by airplane is needed. Typically if travel is needed the poster should be inserted inside a solid cardboard tubing for protection. Confirm that tubing is available from a local source for your sized poster. Another very important issue related to poster size is who will be printing the poster and what sizes of poster paper widths are available at the printer. Is the poster to be printed on heavy coated paper or on glossy photo paper? Photo paper produces the best appearance for a poster. The Technical Support Services group at USF uses glossy photo paper that has widths of 24", 36" and 42". If a conference requires a side of the poster to be other than one of the previously mentions widths, TSS will print the poster on a page that fits the required size but you will have to trim the excess paper from the poster borders. So in summary be sure you understand what size your poster must be, how it will be transported to the display site, and how it will be displayed.
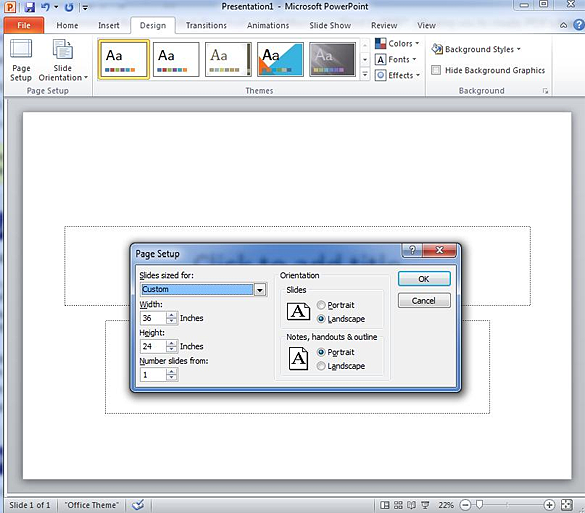
Having carefully determined the size of your poster you may set those dimensions in your poster creation software (in this example PowerPoint is set to 36" x 24" landscape). The appearance of your poster will take careful planning and time to produce a professional looking and informative product. Adhere to the aforementioned poster Design Guidelines on the main poster submission page.
In Office 2007 or Office 2010, set the "Poster Size" by clicking on the Design Tab, then click on "Page Setup" as shown below.

A professional looking poster consists of careful blending of color, text boxes, graphics, and charts. Large posters with too much text and charts can lose your audience in a mass of information that could cause one to miss the whole point of the poster presentation. Size of text should be chosen based on how far observers of the poster will be from the poster. Pictures or graphics should a resolution of at least 150 dots per inch (dpi) to 300 dpi. If a graphic has less than 150 dpi, it may look fine on your computer monitor, but when it is printed full size on the poster, it may look "blocky" or "fuzzy". See examples below.


Poster creation software, like PowerPoint, will have a feature to view the poster at 100% size vs. maybe 15% when creating the poster on your computer monitor. To see if your graphic has sufficient resolution, set the view to 100% and move the viewing area to the graphic. You will then see what the poster graphic will look like when it is printed full size. If it is not clear, you may consider finding a graphic with greater resolution. For readability, text should be black or dark-colored printed on a white or pastel background. Size of text should vary depending on if it is information, headings, or titles. Giving credit where credit is due exhibits professionalism, so mention names of those that assisted in poster development and content including USF logo as necessary. Concerning USF logos - names, logos and symbols of USF are registered federal trademarks owned exclusively by the University of South Florida. Consult www.usf.edu/ucm for further information.
Feel free to consult an excellent source of information on poster content at http://colinpurrington.com/tips/academic/posterdesign.
After creating your poster, please follow the directions available here to convert your poster to PDF as required by ENG TSS.
